New series in the PythonParts learning journey, let’s delve into the modeling of a 3D object : a reinforced concrete column.
1) GUI Script
In this example, we will set up the initial fields required for modeling our reinforced concrete column.
First and foremost, it’s necessary to link it with our main script in an Element tag :
<?xml version=”1.0″ encoding=”utf-8″?>
<Element>
<Script>
<Name>APIHub\objects_3D.py</Name>
<Title>Objects3D</Title>
<Version>1.0</Version>
</Script></Element>
I will first create my first page :
<Page>
<Name>Page1</Name>
<Text>Général</Text></Page>
Please note : Pages represent the tabs in the Allplan palette.
I place an input field for the column’s designation.
I want its name to be clearly visible in the palette and to be directly assigned in the attribute list.
<Parameter>
<Name>ColumnId</Name>
<Text>Repère</Text>
<Value>P01</Value>
<ValueType>Attribute</ValueType>
<AttributeId>18222</AttributeId>
<FontFaceCode>1</FontFaceCode>
</Parameter>
Please note :
- with the value 1 for FontFaceCode, the information text is displayed in bold (more details here) ;
- by choosing a ValueType equal to Attribute along with the desired ID (here 18222), I place the field’s value in the Reference attribute.
Crucial point in the design of a reinforced concrete column, I specify the concrete class that will be used :
<Parameter>
<Name>ConcreteGrade</Name>
<Text>Classe de béton</Text>
<Value>-1</Value>
<ValueType>ReinfConcreteGrade</ValueType>
</Parameter>
Please note : with Value set to -1, Allplan will get the default value from the general options.
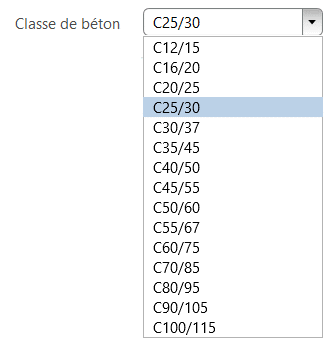
I will now enter the geometric information of my column, placing it in an expander for clarity :
<Parameter>
<Name>GeometryExpander</Name>
<Text>Géométrie</Text>
<ValueType>Expander</ValueType>
</Parameter>
Then comes the choice of the column shape (rectangular or circular):
<Parameter>
<Name>ChoiceRadioGroup</Name>
<Text>Forme :</Text>
<Value>rectangle</Value>
<ValueType>RadioButtonGroup</ValueType>
<Parameter>
<Name>ChoiceRectColumn</Name>
<Text>rectangulaire</Text>
<Value>rectangle</Value>
<ValueType>RadioButton</ValueType>
</Parameter>
<Parameter>
<Name>ChoiceCircColumn</Name>
<Text>circulaire</Text>
<Value>circle</Value>
<ValueType>RadioButton</ValueType>
</Parameter>
</Parameter>
Please note : I choose to use a RadioButton to select the shape, with the rectangular option set as the default.
followed by its dimensions :
<Parameter>
<Name>ColumnLength</Name>
<Text>Longueur</Text>
<FontFaceCode>4</FontFaceCode>
<Value>400.0</Value>
<ValueType>Length</ValueType>
<Visible>ChoiceRadioGroup == “rectangle”</Visible>
</Parameter>
<Parameter>
<Name>ColumnThick</Name>
<Text>Largeur</Text>
<FontFaceCode>4</FontFaceCode>
<Value>400.0</Value>
<ValueType>Length</ValueType>
<Visible>ChoiceRadioGroup == “rectangle”</Visible>
</Parameter>
<Parameter>
<Name>ColumnRadius</Name>
<Text>Rayon</Text>
<FontFaceCode>4</FontFaceCode>
<Value>300.0</Value>
<ValueType>Length</ValueType>
<Visible>ChoiceRadioGroup == “circle”</Visible>
</Parameter>
Please note : the layout will change according to the user’s choice, with length and thickness for a rectangular column, and radius for a circular column.
I can now enter the height of my object, a parameter independent of the desired shape :
<Parameter>
<Name>ColumnHeight</Name>
<Text>Hauteur</Text>
<FontFaceCode>4</FontFaceCode>
<Value>2500.0</Value>
<ValueType>Length</ValueType>
</Parameter>
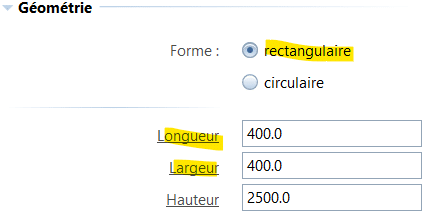
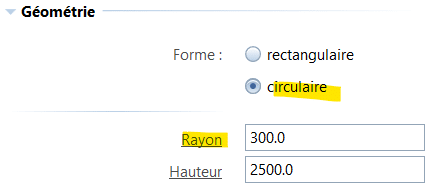
Similar to the previous examples, I will customize the appearance of my column, including offering a hatch or fill.
I create my expander :
<Parameter>
<Name>FormatExpander</Name>
<Text>Format</Text>
<ValueType>Expander</ValueType></Parameter>
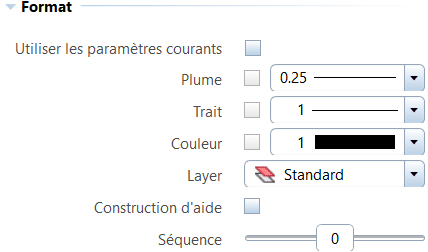
then the general rendering options (layer, color, etc…) with the choice of using current settings :
<Parameter>
<Name>UseGlobalProperties</Name>
<Text>Utiliser les paramètres courants</Text>
<Value>True</Value>
<ValueType>CheckBox</ValueType>
</Parameter>
<Parameter>
<Name>CommonProperties</Name>
<Text></Text>
<Value></Value>
<ValueType>CommonProperties</ValueType>
<Visible>UseGlobalProperties == False</Visible>
</Parameter>
Please note : by default, Allplan will keep the current options, but if you uncheck the box, all rendering properties will be customizable by the user.
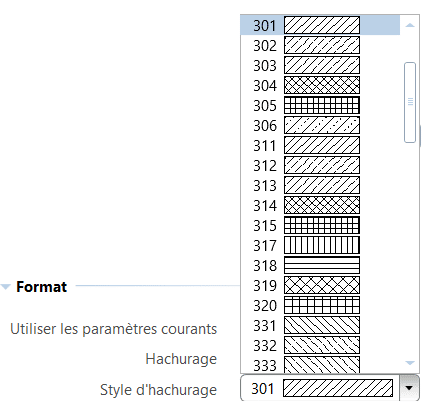
I then propose the other rendering parameters, starting with the hatches :
<Parameter>
<Name>HatchCheckBox</Name>
<Text>Hachurage</Text>
<Value>False</Value>
<ValueType>CheckBox</ValueType>
</Parameter>
<Parameter>
<Name>HatchStyle</Name>
<Text>Style d’hachurage</Text>
<Value>-1</Value>
<ValueType>Hatch</ValueType>
<Visible>HatchCheckBox == True</Visible>
</Parameter>
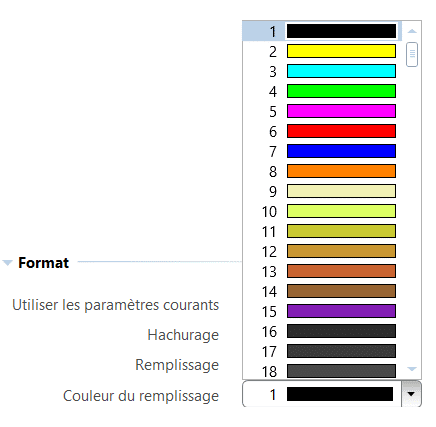
then the fill :
<Parameter>
<Name>FillCheckBox</Name>
<Text>Remplissage</Text>
<Value>False</Value>
<ValueType>CheckBox</ValueType>
</Parameter>
<Parameter>
<Name>FillColor</Name>
<Text>Couleur du remplissage</Text>
<Value>-1</Value>
<ValueType>Color</ValueType>
<Visible>FillCheckBox == True</Visible>
</Parameter>
Back in Allplan, I obtain :
Finally, I will prepare in another tab the options for annotating my column with the same settings seen in the 2D examples :
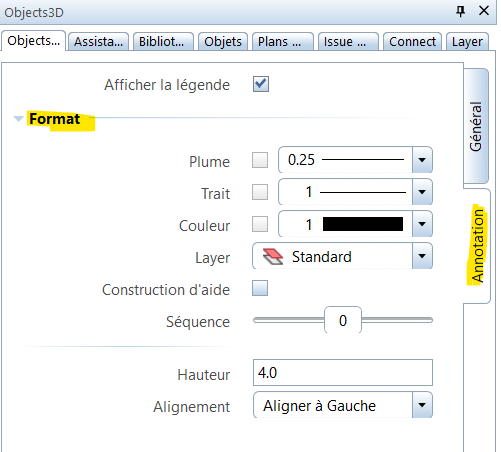
<Page>
<Name>Page2</Name>
<Text>Annotation</Text>
<Parameter>
<Name>ShowTextCheckBox</Name>
<Text>Afficher la légende</Text>
<Value>False</Value><ValueType>CheckBox</ValueType>
</Parameter>
<Parameter>
<Name>TextExpander</Name>
<Text>Format</Text>
<ValueType>Expander</ValueType>
<Visible>ShowTextCheckBox == True</Visible>
<Parameter>
<Name>TextCommonProperties</Name>
<Text></Text>
<Value></Value>
<ValueType>CommonProperties</ValueType>
</Parameter>
<Parameter>
<Name>TextSeparator</Name>
<ValueType>Separator</ValueType>
</Parameter>
<Parameter>
<Name>TextHeight</Name>
<Text>Hauteur</Text>
<Value>4</Value>
<ValueType>Length</ValueType>
</Parameter>
<Parameter>
<Name>TextAlignment</Name>
<Text>Alignement</Text>
<Value>Aligner à Gauche</Value>
<ValueList>Aligner à Gauche|Centrer|Aligner à Droite</ValueList>
<ValueType>StringComboBox</ValueType>
</Parameter>
<Parameter>
<Name>TextOrigin</Name>
<Text> </Text>
<Value>Point3D(0, -1000, 0)</Value>
<ValueType>Point3D</ValueType>
<Visible>False</Visible>
</Parameter>
</Parameter>
</Page>
The establishment of a legend has been studied in this chapter ; I invite you to reread it for more details on this part.
Here, I have supplemented it with another CommonProperties field dedicated to text (for its layer, color, …).
Here is the complete file :
2) Main Script
I start by importing the various modules necessary for the proper execution of the script :
import math
import NemAll_Python_BaseElements as BaseElements
import NemAll_Python_BasisElements as BasisElements
import NemAll_Python_Geometry as Geometry
import NemAll_Python_IFW_ElementAdapter as ElementAdapter
import NemAll_Python_IFW_Input as IFWInput
from BuildingElement import BuildingElement
from BuildingElementAttributeList import BuildingElementAttributeList
from CreateElementResult import CreateElementResult
from PythonPartUtil import PythonPartUtil
from HandlePropertiesService import HandlePropertiesService
from HandleDirection import HandleDirection
from HandleParameterData import HandleParameterData
from HandleParameterType import HandleParameterType
from HandleProperties import HandleProperties
Please note : I am now inserting the math module.
The two functions, check_allplan_version and move_handle, are identical to the previous examples. I won’t revisit their operation here. Let’s directly look at the create_element function.
I start by initializing my PythonPart, including its list of objects to create (model_ele_list), its handles (handle_list), and the list of its attributes (attr_list) :
model_ele_list = []
handle_list = []
attr_list = BuildingElementAttributeList()
pyp_util = PythonPartUtil()
Then I retrieve the information for my 3D object from the Allplan palette, starting with the ID :
column_id = build_ele.ColumnId.value
the concrete grade :
column_concrete_gr_value = build_ele.ConcreteGrade.value
Please note : Allplan returns the value of the concrete class as an integer (for example C25/30 => 4). Therefore, we need to set up a dictionary to associate this integer with its equivalent in text :
concrete_grade_dict = {1: ‘C12/15’,
2: ‘C16/20’,
3: ‘C20/25’,
4: ‘C25/30’,
5: ‘C30/37’,
6: ‘C35/45’,
7: ‘C40/50’,
8: ‘C45/55’,
9: ‘C50/60’,
10: ‘C55/67’,
11: ‘C60/75’,
12: ‘C70/85’,
13: ‘C80/95’,
14: ‘C90/105’,
15: ‘C100/115’,
}
column_concrete_gr = concrete_grade_dict[column_concrete_gr_value]
I retrieve the information about the chosen shape :
choice = build_ele.ChoiceRadioGroup.value
the entered dimensions :
column_length = build_ele.ColumnLength.value
column_thickness = build_ele.ColumnThick.value
column_radius = build_ele.ColumnRadius.value
column_height = build_ele.ColumnHeight.value
as well as the rendering properties :
if build_ele.UseGlobalProperties.value:
com_prop = BaseElements.CommonProperties()
com_prop.GetGlobalProperties()
else:
com_prop = build_ele.CommonProperties.value
the hatching :
has_hatch = build_ele.HatchCheckBox.value
hatch_prop = BasisElements.HatchingProperties()
hatch_prop.HatchID = build_ele.HatchStyle.value
and the fill :
has_fill = build_ele.FillCheckBox.value
fill_prop = BasisElements.FillingProperties()
fill_prop.FirstColor = BaseElements.GetColorById(build_ele.FillColor.value)
as seen before, the text style for the legend :
is_showing_annotation = build_ele.ShowTextCheckBox.value
text_com_prop = BaseElements.CommonProperties()
text_com_prop = build_ele.TextCommonProperties.value
text_dict = {“Aligner à Gauche” : BasisElements.TextAlignment.eLeftMiddle,
“Centrer” : BasisElements.TextAlignment.eMiddleMiddle,
“Aligner à Droite” : BasisElements.TextAlignment.eRightMiddle
}
text_prop = BasisElements.TextProperties()
text_prop.Height = text_prop.Width = build_ele.TextHeight.value
text_prop.Alignment = text_dict[build_ele.TextAlignment.value]
text_origin = build_ele.TextOrigin.value
Please note : here as well, I use a dictionary to link an user input (a string) to an alignment parameter.
I build my PythonPart and return the entirety of my object :
model_ele_list = pyp_util.create_pythonpart(build_ele)
return CreateElementResult(model_ele_list, handle_list)
I temporarily exit my create_element function to prepare my classes.
Indeed, we have already discussed the power of Object-Oriented Programming (OOP), and once again, this technique will greatly help us in our code…
-
Class Objects3D
I start by defining my parent class Objects3D with the functions I will need :
- calculation of dimensions for attributes ;
- geometry creation ;
- creation of the fill/hatch outline ;
- Allplan rendering.
class Objects3D:
def __init__(self, object_prop):
self.object_prop = object_prop
self.geo = None
def calcul_dimensions(self):
pass
def create_geo(self):
pass
def create_hatch_geo(self):
pass
def add_view(self):
object_3d = BasisElements.ModelElement3D(self.object_prop, self.geo)
return object_3d
-
Class Handle
As in the previous example, I set up a class for my future handles :
class Handle:
def __init__(self,
handle_id,
handle_point,
ref_point,
handle_param_data,
handle_move_dir,
handle_info_text):
self.handle_id = handle_id
self.handle_point = handle_point
self.ref_point = ref_point
self.handle_param_data = handle_param_data
self.handle_move_dir = handle_move_dir
self.handle_info_text = handle_info_text
-
Class Cuboid
Default assumption for the shape of my column, I prepare with a child class my rectangular column.
class Cuboid(Objects3D):
def __init__(self,
object_prop,
column_length,
column_thick,
column_height):Objects3D.__init__(self, object_prop)
self.column_length = column_length
self.column_thick = column_thick
self.column_height = column_height
self.name_dim = f”{round(column_length / 10)}x{round(column_thick / 10)}”
Please note : name_dim will be one of the fields used for the legend, indicating here the length and thickness (in cm).
I won’t forget the configuration of the handles (here 3 for the length, thickness, and height) :
self.handles_prop = [Handle(“ColumnLengthHandle”,
Geometry.Point3D(self.column_length, 0, 0),
Geometry.Point3D(),
“ColumnLength“,
HandleDirection.X_DIR,
“Longueur”
),
Handle(“ColumnThickHandle”,
Geometry.Point3D(self.column_length, self.column_thick, 0),
Geometry.Point3D(self.column_length, 0, 0),
“ColumnThick“,
HandleDirection.Y_DIR,
“Largeur”
),
Handle(“ColumnHeightHandle”,
Geometry.Point3D(0, 0, self.column_height),
Geometry.Point3D(),
“ColumnHeight“,
HandleDirection.Z_DIR,
“Hauteur”
)
]
Then I initiate the calculation of the various dimensions that will be in the future attributes with calculate_dimensions.
For more flexibility, I concatenate the results into a tuple :
def calcul_dimensions(self):
length = self.column_length * 1e-3
thickness = self.column_thick * 1e-3
radius = 0
height = self.column_height * 1e-3
surface = length * thickness
volume = surface * height
return (length, thickness, radius, height, surface, volume)
Please note :
- as my column is rectangular, I specify a radius value equal to 0 ;
- I pay attention to the units ; indeed, the Length field in the palette returns values in mm.
I generate the geometry of my column with create_geo using CreateCuboid :
def create_geo(self):
placement = Geometry.AxisPlacement3D(Geometry.Point3D(),
Geometry.Vector3D(1, 0, 0),
Geometry.Vector3D(0, 0, 1)
)
self.geo = Geometry.BRep3D.CreateCuboid(placement,
self.column_length,
self.column_thick,
self.column_height
)
Please note : we clearly find our 3 key dimensions (length, thickness and height) placed along a well-defined axis
Next is the outline of my fill or hatch using CreateRectangle :
def create_hatch_geo(self):
hatch_geo = Geometry.Polygon2D.CreateRectangle(Geometry.Point2D(),
Geometry.Point2D(self.column_length, self.column_thick)
)
return hatch_geo
Please note : once again, we note our 2 key dimensions (length and thickness) for the creation of the outline
-
Class Cylinder
Second assumption for my column, here is the child class for the circular shape.
As before, I start from my parent class and adapt it to my case :
class Cylinder(Objects3D):
def __init__(self,
object_prop,
column_rad,
column_height):
Objects3D.__init__(self, object_prop)
self.name_dim = f”Ø{round(column_rad / 10)}”
self.column_radius = column_rad
self.column_height = column_height
with my handles (one for the radius and an another for the height) :
self.handles_prop = [Handle(“ColumnRadiusHandle”,
Geometry.Point3D(self.column_radius, 0, 0),
Geometry.Point3D(),
“ColumnRadius“,
HandleDirection.X_DIR,
“Rayon”
),
Handle(“ColumnHeightHandle”,
Geometry.Point3D(0, 0, self.column_height),
Geometry.Point3D(),
“ColumnHeight“,
HandleDirection.Z_DIR,
“Hauteur”
)
]
I calculate the values of the geometric attributes :
def calcul_dimensions(self):
length = 0
thickness = 0
radius = self.column_radius * 1e-3
height = self.column_height * 1e-3
surface = math.pi * radius ** 2
volume = surface * height
return (length, thickness, radius, height, surface, volume)
Please note :
- as my column is cylindrical, I specify a length and thickness value to 0 ;
- I always pay attention to the units ; indeed, the Length field in the palette returns values in mm.
I create my volume with Cylinder3D :
def create_geo(self):
placement = Geometry.AxisPlacement3D(Geometry.Point3D(),
Geometry.Vector3D(1, 0, 0),
Geometry.Vector3D(0, 0, 1)
)
self.geo = Geometry.Cylinder3D(placement,
self.column_radius,
self.column_radius,
Geometry.Point3D(0, 0, self.column_height)
)
Please note : we can see our 2 key dimensions well : the radius (called twice for the large and small radius of the cylinder) and a 3D point fetching the height. Once again, everything is positioned on a well-defined axis.
Final step for this child class, the fill outline :
def create_hatch_geo(self):
line = Geometry.Line3D(0, 0, 0, self.column_radius, 0, 0)
angle = Geometry.Angle()
angle.Deg = 10
rotation_axis = Geometry.Line3D(Geometry.Point3D(),
Geometry.Point3D(0, 0, 1)
)
transformation_matrix = Geometry.Matrix3D()hatch_geo = Geometry.Polygon2D()
for i in range(36):
transformation_matrix.SetRotation(rotation_axis, angle)
line = Geometry.Transform(line, transformation_matrix)
hatch_geo += Geometry.Point2D(line.EndPoint.X, line.EndPoint.Y)
hatch_geo += hatch_geo.StartPoint
return hatch_geo
Please note :
The HatchingElement function that we will use requires a polygon, so we need to build it from the radius.
The principle is simple : I define a construction line with the length equal to the radius. I add the end of my line to my polygon, applying a rotation of 10° to it in a loop.
I make sure to close my polygon by returning to my starting point.
-
Function create_element
All my classes are ready, all that remains is to finalize my create_element function.
I construct my column by calling the desired class :
if choice == “rectangle”:
my_column = Cuboid(com_prop, column_length, column_thickness, column_height)
else:
my_column = Cylinder(com_prop, column_radius, column_height)
my_column.create_geo()
I add it to my Allplan document :
pyp_util.add_pythonpart_view_2d3d(my_column.add_view())
I create my handles :
for item in my_column.handles_prop:
handle = HandleProperties(item.handle_id,
item.handle_point,
item.ref_point,
[HandleParameterData(item.handle_param_data, HandleParameterType.POINT_DISTANCE)],
item.handle_move_dir
)
handle.info_text = item.handle_info_text
handle_list.append(handle)
Please note : since the creation of handles has already been covered in previous examples, I won’t go into detail on this command here.
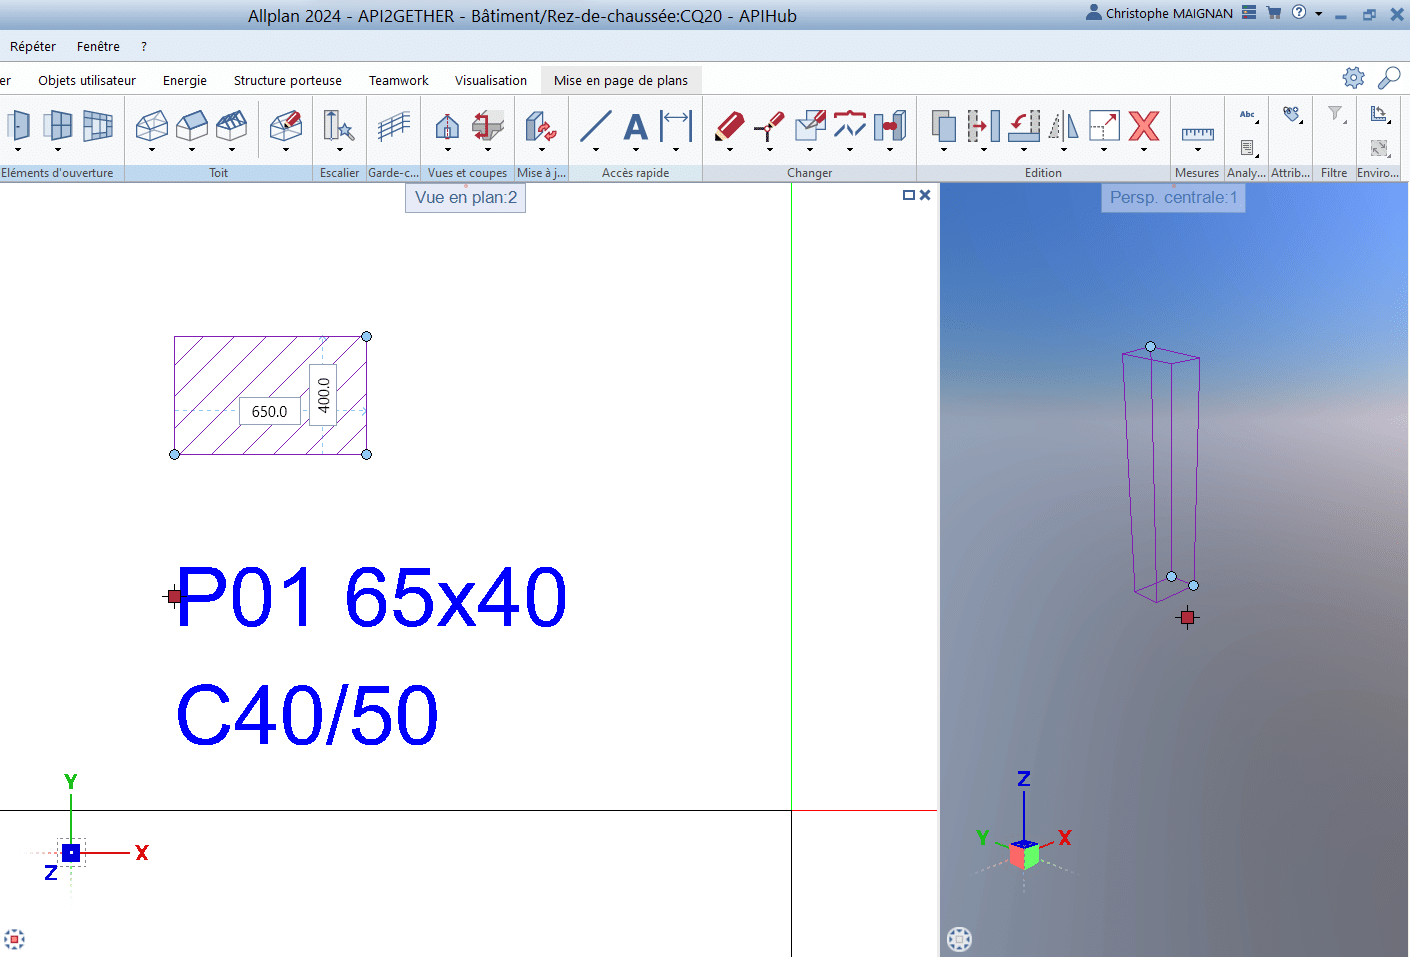
Next comes the legend :
if is_showing_annotation:
text = f”{column_id} {my_column.name_dim}”
if column_concrete_gr_value > 4:
text += f”\n{column_concrete_gr}”
origin = Geometry.Point2D(text_origin)
pyp_util.add_pythonpart_view_2d(BasisElements.TextElement(text_com_prop, text_prop, text, origin))text_handle = HandleProperties(“Text”,
text_origin,
Geometry.Point3D(),
[HandleParameterData(“TextOrigin”, HandleParameterType.POINT, False)],
HandleDirection.XYZ_DIR
)text_handle.handle_type = IFWInput.ElementHandleType.HANDLE_SQUARE_RED
text_handle.info_text = “Origine du texte”
handle_list.append(text_handle)
Please note :
The legend appears if the checkbox is checked.
It starts with the column’s ID followed by its dimensions. If the concrete is of an enhanced class (> C25/30), it’s also indicated.
Finally, an anchor point is defined to move the annotation if needed.
Hatchings are added with HatchingElement :
if has_hatch:
pyp_util.add_pythonpart_view_2d(BasisElements.HatchingElement(com_prop, hatch_prop, my_column.create_hatch_geo()))
As well as the fill with FillingElement :
if has_fill:
pyp_util.add_pythonpart_view_2d(BasisElements.FillingElement(com_prop, fill_prop, my_column.create_hatch_geo()))
Please note : if the condition is satisfied, we will generate a hatch or a fill with their respective properties and the outline created in the child class.
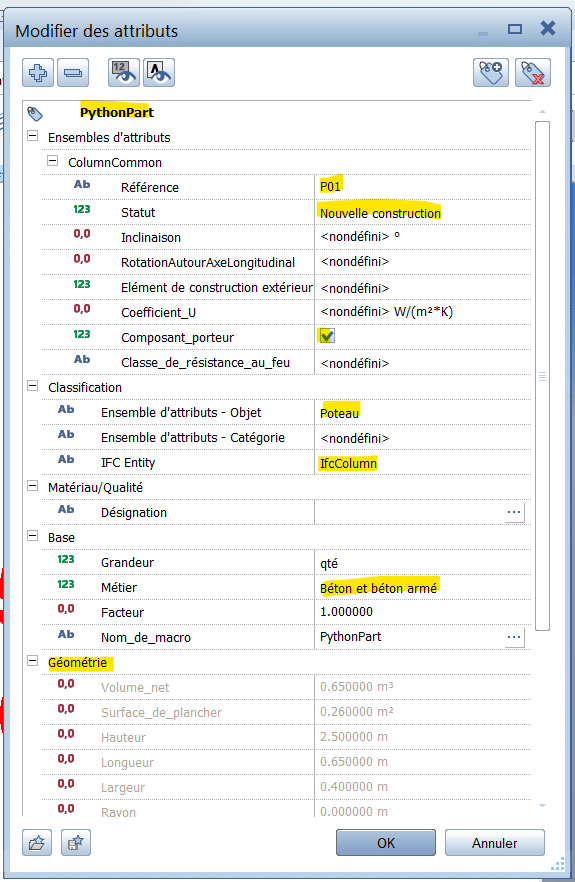
We look at the setup of attributes, starting with a new feature in Allplan 2024 : Attribute Sets (here, Column).
# Attribute set object @18358@
attr_list.add_attribute(18358, “Column”)
Then the Trade (here, 13 corresponds to “Concreting work”)
# Trade @209@
attr_list.add_attribute(209, 13)
Setting 0 as the Status returns “New building”
# Statut @49@
attr_list.add_attribute(49, 0)
We indicate that our column will be a Load-Bearing one
# Load bearing @573@
attr_list.add_attribute(573, 1)
Next is the Concrete Grade
# Concrete grade @1905@
attr_list.add_attribute(1905, column_concrete_gr)
We fill in all the calculated Geometric Properties from the child classes
# Geometry
length, thickness, radius, height, surface, volume = my_column.calcul_dimensions()
attr_list.add_attribute(220, length)
attr_list.add_attribute(221, thickness)
attr_list.add_attribute(107, radius)
attr_list.add_attribute(222, height)
attr_list.add_attribute(293, surface)
attr_list.add_attribute(226, volume)
attr_list.add_attributes_from_parameters(build_ele)
pyp_util.add_attribute_list(attr_list)
Please note :
Here, we create a list of attributes to be assigned using the add_attribute command by specifying the attribute’s ID and its value.
Then, we add the attributes indicated from the palette, and inject this set into our PythonPart.
Here is the complete file :
In this example, we have revisited many functions used previously and once again utilized the power of OOP.
With the PythonParts API, we see that Allplan offers us a plethora of possibilities that we will continue to explore throughout this chapter.

0 Comments